10/24/2013

Localization of e-learnings - Articulate Studio in focus


With the rapid development of digital content and electronic media, more and more e-learning materials are coming our way for localization. Some were particularly tricky for getting them localized properly. In this article we will focus on e-learning courses created in Articulate Studio.

For those who have never heard of this product, it’s a solution for PowerPoint enhancement and design of e-learnings on its basis. This tool is fit for creating short e-learnings, especially if you already have a prepared PowerPoint presentation.  

Let us assume that you made a presentation for your co-workers on a new reporting approach in your company. Isn’t it reasonable to reinforce the presented information by using applicable training materials? You may want to consider Articulate Studio as a tool to help you.

With this software you will be able to fill your presentation with interactive quizzes, flowcharts and animated explanations. However, its primary benefit consists in providing an interactive course with presentation material, extended questions, audio feedback and additional reading. As a matter of fact a common PowerPoint presentation turns into a SCORM-compatible course with all its advantages.

Yet, at the same time, one might experience certain difficulties when localizing this type of material. Let’s suppose your company has other offices overseas, therefore it would be great to have these types of materials adapted for colleagues in other countries.

The first and biggest problem we have encountered concerns the process of translating the text content. Articulate Studio is equipped with a convenient method of exporting texts to .doc file. Unfortunately, there is no reverse conversion function. Without a reverse conversion you will have to substitute the original text with the translations manually, which takes lots of time and efforts. PowerPoint has the same flaw, though.

Apart from this not all interface strings of the e-learning are exported to .doc file, such help texts as “Click next to continue”, “Your score”, “Result”, etc often do not get to the .doc file.
Another disappointing moment consists in the limited number of built-in interface languages (only 10), though the product allows to add new languages manually.
It was noticed that the title length of the Articulate Quiz or Articulate Engage has limitations. When translating the English title we had to considerably shorten the translation.

However, on the whole if putting aside the localization problems this software solution can be considered sufficiently smart and helpful. The author has a possibility to add interactive content, flash videos, various quizzes, sound effects, and additional learning materials in the form of supplements, etc. The product is perfect for companies that have a large stock of learning materials, such as presentations, and wish to import them to LMS.

Just yesterday I got a new Articulate Studio version. One of the new features is import in Excel spreadsheet or txt file. I will write about the improvements soon. I hope there is something for localization too.

About Articulate Studio - http://www.articulate.com/

By Bohdan Kruk

Senior Localization Specialist

10/15/2013

The not so short introduction to EC2 instances in AWS SDK for .NET

Intro

Today is the era of cloud computing: never-ending computing resources available on demand. Amazon is one of the biggest players on the market of cloud computing. It provides different cloud services: Elastic Cloud, Elastic Block Store, Simple Email Service, Cloud Drive and others. Amazon Elastic Compute Cloud (EC2) allows people to launch virtual servers in the Amazon Web Services (AWS) cloud. It provides various types of virtual computing environments, storage and virtual isolated networks.

In this post we’ll learn how to work with EC2 using AWS SDK for .NET. You can download SDK from the official website. We’ll assume you’ve already created some sample project in your favorite C#/.NET development environment and referenced AWSSDK.dll in that project. We’ll mostly use Amazon.EC2, Amazon.EC2.Model and Amazon.Runtime namespaces. So let’s take a look on some common operations with AWS cloud: launching, tagging and stopping EC2 instances, describing environment and others.

Instantiation

Every operation with AWS is executed using AmazonEC2 interface. We can create Amazon EC2 client just using simple constructor:

AmazonEC2 amazonClient = new AmazonEC2Client(accessKey, secretKey);

where accessKey and secretKey are credentials, which we can get in our Amazon account after registration.

Another simple constructor uses accessKey and secretKey from application configuration file and we have to pass just an element of RegionEndPoint enumeration:

public AmazonEC2Client(RegionEndpoint region);

In case we need something more sophisticated, there are tons of constructor overloads. One of the most useful is a constructor with AWSCredentials and AmazonEC2Config parameters:

public AmazonEC2Client(AWSCredentials credentials, AmazonEC2Config config)

For example, we can pass BasicAWSCredentials instance with accessKey and secretKey for the first parameter and setup proxy settings with AmazonEC2Config class and ProxyPort/ProxyHost properties for the second parameter.

Validating credentials

We can create any simple request to AWS in order to validate credentials. Let’s choose a request that won’t lead to big data transfer between our application and AWS services, because credentials verification can be used quite frequently. For example we will use DescribeAvailabilityZones request but we can also use DescribeRegions request or any other. If request call throws an exception (AmazonEC2Exception), we can check it’s type from string property ErrorCode. If it’s equal to “AuthFailure”, than our credentials are invalid. Source code can look like this:

try
{
    var ec2Client = new AmazonEC2Client(accessKey, secretKey);
    var response = ec2Client.DescribeAvailabilityZones();
   
    return true;
}
catch (AmazonEC2Exception e)
{
    return false;
}


Describing environment

If our application lets user to configure any API credentials or we’re just showing some useful information about it’s service, we will have to describe our Amazon environment: Key Pair Names, Security Groups, Placement Groups, Availability Zones, VPC subnets etc.

General requesting template looks like this:


var ec2Client = new AmazonEC2Client(accessKey, secretKey);
var describeGroupsRequest = new DescribePlacementGroupsRequest();

try
{
    var response = ec2Client.DescribePlacementGroups(describeGroupsRequest);
    var placementGroupsResult = response.DescribePlacementGroupsResult;
    var placementGroupsInfo = placementGroupsResult.PlacementGroupInfo;
    placementGroupNames = placementGroups.Select(group => group.GroupName);
}
catch (Exception e)
{
    placementGroupNames = Enumerable.Empty<string>();
}


If we’re going to describe many environment items and copy-paste code above into each method, it will do some odd job: each time creating and destroying instance of AmazonEC2Client class. That’s why we can create it’s instance only one time and then execute all needed requests, accumulate results in some storage and then return it.


Describing instances

DescribeInstances request is used to track all instances that we own. We can request useful information about all or some certain instances. In order to choose these certain instances we can fill filter parameter of DescribeInstancesRequest to match specified instance IDs, key pair names, availability zone, instance type, current instance state and many others.

var ec2Client = new AmazonEC2Client(accessKey, secretKey);

var describeRequest = new DescribeInstancesRequest();

describeRequest.Filter.Add(new Filter(){Name="instance-state-name",
Value="running"});


var runningInstancesResponse = ec2Client.DescribeInstances(describeRequest);
var runningInstances =
runningInstancesResponse.DescribeInstancesResult.Reservation.SelectMany(reservation =>
reservation.RunningInstance).Select(instance => instance.InstanceId);


Variable runningInstances will contain IDs of all instances that are running as a result of such DescribeInstancesRequest with instance-state-name filter. We can notice interesting code convention of Amazon SDK when list of objects (like list of RunningInstance instances) is named in singular (named RunningInstance). It's because of real nature of these classes: all of them are just object model of XML response of AWS.

Running instances

Running instances is definitely one of the main purposes of using AWS EC2. It’s a bit different for On-Demand and Spot Instances.

To launch On-Demand instance, we have to create a RunInstances request and fill it properties wisely. First, we need set Image Id to launch and preferable number of instances from this image. This preferable number consists of minimum and maximum number of instances to launch. If Amazon capacity allows to launch maximum number of instances it does so. If no it tries it’s best to satisfy us. Our request fails if Amazon is not able to launch minimum value of instances we requested. Secondly, we can specify Key Pair name, instance type, security group and many other in our RunInstancesRequest.

var ec2Client = new AmazonEC2Client(accessKey, secretKey);
 
var runRequest = new RunInstancesRequest();
runRequest.ImageId = imageID;
runRequest.MinCount = minimumValue;
runRequest.MaxCount = maximumValue;
runRequest.InstanceType = “t1.micro”;
// some other configurations

var runInstancesResponse = ec2Client.RunInstances(runRequest);
var runInstancesResult = runInstancesResponse.RunInstancesResult;
var runningIDs = runInstancesResult.Reservation.RunningInstance.Select(i => i.InstanceId);


Response contains actually started running instances. Such request can throw AmazonEC2Exception with ErrorCode “InstanceLimitExceeded” if we are not allowed to run as many instances as were requested (limitations of current plan in Amazon account).

Requesting on-demand instances can fail even not for our fault, but because Amazon is not able to provide us with such number of EC2 instances in our region at the moment. A “InsufficientInstanceCapacity” error code is thrown with AmazonEC2Exception in this case.

Tagging instances

EC2 tag is just a key value pair which we can assign to each running instance (and spot requests). Tags are useful if we want to supply our instances with some additional information (specific for our application). Keys and values are simple strings, but no one prohibit to base64-encode anything we like in that tag.
We can tag only already running instances with CreateTagsRequest: we need to specify list of instance id’s and tags we want to assign to it and any some additional information. See sample code below:

var ec2Client = new AmazonEC2Client(accessKey, secretKey);
 
var createTagRequest = new CreateTagsRequest();
createTagRequest.ResourceId.Add(someInstanceId);
createTagRequest.Tag.Add(new Tag { Key = “NodeRole”, Value = “LogCollector” });

ec2Client.CreateTags(createTagRequest);


Stopping instances

Just like running AWS SDK provides us with API to stop running instances. And the procedure  is also a bit different for On-Demand and Spot instances.

To stop On-Demand instance, we have to create TerminateInstances request and pass ID of an instance we want to terminate. Simple as that:

var ec2Client = new AmazonEC2Client(accessKey, secretKey);
 
var terminateRequest = new TerminateInstancesRequest();
terminateRequest.InstanceId.Add(instancesId);

var terminateResponse = ec2Client.TerminateInstances(terminateRequest);
var terminatingInstances = terminateResponse.TerminateInstancesResult.TerminatingInstance.Select(ti => ti.InstanceId);


Conclusion

AWS SDK allows us to manage EC2 instances easily and it’s consistent in terms of code conventions. SDK allows us to manage everything from code like if we were working from Amazon web dashboard and it’s worth looking into because cloud computing becomes a new trend today. The current post covers some basic operations with SDK. To continue learning AWS SDK take a look at official documentation.

10/02/2013

Getting started with PowerShell

PowerShell was released by Microsoft long ago – on January 30, 2007. Despite this many developers, build engineers and system administrators continue to use more familiar batch scripts (aka bat or cmd scripts). If you are one of such persons this post may help change your attitude towards PowerShell.

Running your first PowerShell script

Most probably you get used to run cmd.exe. Try powershell this time:


If you saw PowerShell console previously you’ll immediately argue: why console background is black but now awesome blue? Well, this is because blue color is set in Windows shortcut properties, so you need run PowerShell from shortcut to get it:


Awesome!
Now you can use PowerShell console in a way as if it is cmd console. Type cd, dir, mkdir, echo, rm, etc. You may even start believing you are working in cmd console.


PowerShell team did their best to make transition from batch scripts to PowerShell scripts as easy as possible. If you are familiar with Linux bash scripts you’ll also be happy with PowerShell:


All this is possible because of PowerShell aliasing feature. Commands (in PowerShell they are called cmdlets, pronounced command-lets) have aliases:

Here we see that dir is simply an alias for Get-ChildItem cmdlet. And by default Get-ChildItem cmdlet has three aliases: dir, gci and ls. You can create new aliases if you wish. Let’s discover real names for all aliases we used in our first script:

PS C:\tmp> get-alias cd, echo, type, rm
CommandType     Name
-----------     ----
Alias           cd -> Set-Location
Alias           echo -> Write-Output
Alias           type -> Get-Content
Alias           rm -> Remove-Item

As you can see PowerShell cmdlet for navigating to new location is Set-Location, but it is so much simpler to just type cd.

Is PowerShell better than cmd?

Have you ever tried to write simple if statements in cmd script, or (tears on my eyes...) for loop?

REM print numbers from 1 to 10
for /l %x in (1, 1, 10) do echo %x

And that code works only if you write it in cmd console. If you try save it to a file and run the file (try) you'll be surprised. Here is PowerShell code analogue:

# print numbers from 1 to 10
for ($i=1; $i -le 10; ++$i) { echo $i }

The only strange part of that code is -le (you cannot use < and > in shell scripts), everything else is so simple and familiar.
With PowerShell you have full power of .NET in your hands. Cmd reminds about old DOS times.
PowerShell is not just a command-line shell – it is powerful scripting environment. You can write own "methods" (cmdlets), use third-party cmdlets libraries.
PowerShell comes with Windows PowerShell ICE editor in which you can write/run/debug your scripts:

And finally, PowerShell has a default blue background and cmd has a default black background. Just kidding.

Running PowerShell script stored in a file

By convenience PowerShell scripts are stored in files with ps1 eextension. Create simple script and save it to test.ps1 file:

# this is comment
Write-Output "Hello from PowerShell script file"

In explorer navigate to directory with test.ps1 file and double-click on it. Most probably test.ps1 will be opened as simple text file in notepad.exe. This is because by default ps1 files are associated with notepad.exe. This saves users from accidentally running malware scripts (a common problem of bat and cmd scripts).
One of the easiest ways to run a script is to launch PowerShell console, navigate to directory with test.ps1 file and type .\test.ps1 then Enter:

PS C:\> cd C:\tmp
PS C:\tmp> .\test.ps1
File C:\tmp\test.ps1 cannot be loaded because the execution of scripts is disabled on this system. Please see "get-help about_signing" for more details.
At line:1 char:11
+ .\test.ps1 <<<<
    + CategoryInfo          : NotSpecified: (:) [], PSSecurityException
    + FullyQualifiedErrorId : RuntimeException
PS C:\tmp>

One more anti-malware protection: by default you cannot run PowerShell files! Let’s fix this. Run PowerShell as administrator and type following command:

PS C:\Windows\system32> Set-ExecutionPolicy RemoteSigned -Force

Above line changes PowerShell scripts execution policy from Restricted to RemoteSigned – allow run all locally created scripts. More about PowerShell execution policy you can read on the Internet.
Now you can finally run test.ps1 script:

PS C:\tmp> .\test.ps1
Hello from PowerShell script file
PS C:\tmp>

Success! Yes, it took a bit of investigations and work to get things working.

PowerShell in action

Let’s see some examples of useful things you can do with PowerShell.
  • Find all Internet Explorer processes and terminate them:
Get-Process iexplore | Stop-Process
  • Restart TeamCity Server service:
PS C:\tmp> Get-Service TeamCity | Restart-Service
  • Create Windows shortcut, for example to notepad.exe:
$shell = New-Object -COM WScript.Shell
$shortcut = $shell.CreateShortcut("C:\tmp\ShortCutToNotepad.lnk")
$shortcut.TargetPath = "%windir%\system32\notepad.exe"
$shortcut.Save()
  • Get 10 newest records from System event log:
Get-EventLog system -newest 10
  • List Windows Registry Key containing auto-start applications:
cd HKLM:\Software\Microsoft\Windows\CurrentVersion\Run
Get-ItemProperty .


Using C# code in PowerShell script

Being .NET based technology PowerShell gives you full power of .NET platform. Your script needs generate random number? No problem – just use System.Random class. Actually PowerShell allows you to write scripts almost in C# language, so you can implement arbitrary custom logic in PowerShell!

PS C:\tmp> $rnd = New-Object System.Random
PS C:\tmp> $i = $rnd.Next(10)
PS C:\tmp> [System.Console]::WriteLine("And the answer is ... {0}", $i)
And the answer is ... 7
PS C:\tmp>

Incredible, right?
What time is it now?

Get-Date
Tuesday, October 01, 2013 1:17:12 PM
[System.DateTime]::Now
Tuesday, October 01, 2013 1:17:22 PM

You can even use Windows Forms .NET API to create and show graphical dialogs directly from PowerShell:

Add-Type -AssemblyName System.Windows.Forms
$form = New-Object Windows.Forms.Form
$form.Size = New-Object Drawing.Size @(200,100)
$form.StartPosition = "CenterScreen"
$form.Text = "Hello!!!"
$form.ShowDialog()

Want use Amazon .NET API to start a new micro instance? Download Amazon .NET API and copy AWSSDK.dll to C:\tmp directory. Then write a script:

[Reflection.Assembly]::LoadFile("C:\tmp\AWSSDK.dll")
$AWSAccessKey = "<your access key>"
$AWSSecretKey = "<your secret key>"
$ec2 = [Amazon.AWSClientFactory]::CreateAmazonEC2Client($AWSAccessKey, $AWSSecretKey)
$request = New-Object Amazon.EC2.Model.RunInstancesRequest
$request.ImageId = $amiImageId
$request.InstanceType = 't1.micro'
…
$ec2.RunInstances($request)

Again, all above code is very similar to C# code. With time you’ll get used that all variable names in PowerShell must start from dollar sign ($), instead of new keyword you’ve to write New-Object, square brackets double colons static methods invocation syntax and other peculiarities.

PowerShell Remoting

PowerShell would not be so popular without PowerShell Remoting feature which was introduces in PowerShell 2.0. It allows you run PowerShell scripts on remote machines alike you run them on your local machine. It is very similar to Linux Secure Shell protocol (SSH). As everything potentially dangerous in PowerShell, PowerShell Remoting is not enabled by default. And you cannot enable it remotely :). So you must have RDP access to machine on which you want enable PowerShell remoting and be a member of Administrator group on that machine. You can Google how to enable PowerShell remoting. Here is short instruction:
  • RDP to TEST-PC and start elevated PowerShell console (Run as Administrator).
PS C:\Users\roman.turovskyy> Enable-PSRemoting -Force
WinRM has been updated to receive requests.
WinRM service started.
  • Return back to your working machine and start elevated PowerShell console. Enter following:
PS C:\windows\system32> cd WSMan:\localhost\Client
PS WSMan:\localhost\Client> Set-Item .\TrustedHosts * -Force
  • This will allow you to connect to any machine. Now enable PowerShell remoting on your machine and establish remote session with own machine (localhost):
PS C:\tmp> Enable-PSRemoting -Force
PS C:\tmp> Enter-PSSession -ComputerName localhost
[localhost]: PS C:\Users\roman.turovskyy\Documents>
  • Above line indicates that PowerShell remoting on your machine is properly configured. Now establish remote session with TEST-PC machine:
[localhost]: PS C:\Users\roman.turovskyy\Documents> Exit-PSSession
PS C:\tmp> Enter-PSSession -ComputerName TEST-PC
[TEST-PC]: PS C:\Users\roman.turovskyy\Documents>

Now you can run PowerShell commands on TEST-PC! Ensure that this is really TEST-PC by reading computer name from environment variable:

[TEST-PC]: PS Env:\> echo $env:COMPUTERNAME
TEST-PC

With PowerShell remoting you can run your script on many machines. For example you have a task to stop Windows Time service on many machines. Once you have PowerShell remoting configured on these machines you can use following script:

@('TEST-PC ', 'TEST-PC2') | foreach { Invoke-Command -ComputerName $_ -ScriptBlock { Get-Service W32Time | Stop-Service } }

$_ refers to current iteration value in foreach statement. You can also store enter-separated list on machines in a file:

PS C:\tmp> Get-Content machines.txt | foreach { Invoke-Command $_ { $env:COMPUTERNAME  } }
TEST-PC
TEST-PC1

Conclusion

PowerShell is very powerful shell scripting language. Being built on top of .NET it allows reusing existing .NET classes and writing arbitrary custom logic almost like in C# language. PowerShell remoting enables remote scriptable control over computes within your network. On our project we use PowerShell to deploy products on many machines within LAN. If you are not using PowerShell yet – take a look at it!

9/30/2013

Deployment techniques in the QNX P2P network

    What is the best deployment tool to choose? This is a common question almost on every project, no matter it is open-source, proprietary, personal or corporate. And the answer is... it depends! It depends on your needs, on some available instruments and on your abilities of course.

Deployment approaches overview

    The easiest approach is to use packaging tools, available for your operating system. These tools generate self-standing packages, which contain files for your application. It’s very useful and user-friendly, because this packages can be either copied to each machine and installed manually, or you can setup your own server-repository and configure your operating system to work with it. This type of deployment saves you a lot of time but it’s not always available and sometimes your application is too complicated to be packed into a system package.
    The other approach is to use software, which already provides deployment facilities you need, and your task is to write a proper configuration for it. Such tools also often have ability to maintain some versioning for your deployed software which is quite nice. If there is a problem, you can always revert everything to the previous working installation. Capistrano, Vlad the Deployer are the examples of such tools.
    But what if we have something more hardcore? No packages, no version control, no third-party tools. We cannot use git, python, ruby and even many of the GNU coreutils. Welcome to almost bare QNX Neutrino 6.5 installation! Everything we have is a Korn shell, tar and some other few QNX built-ins. Our goal is to create such a deployment system, which would deploy our packages to a set of other nodes in the QNX network. The other nodes are extremely bare. Binaries of QNX core, cp, mv, uname and date utilities are everything that is installed on those nodes.

Qnet magic

    This task looks like next to impossible on the first look, while we know nothing about the Qnet protocol. It is one of very nice core features of QNX Neutrino operating system. Qnet lets some tightly coupled trusted machines to share their resources and standard utilities to manipulate files everywhere on the QNX network as if they were on your machine. In addition, the Qnet protocol doesn't do any authentication of remote requests; files are protected by the normal permissions that apply to users and groups, which is also a cool feature.
    Qnet names resolution is handled by the Qnet protocol manager, which creates a /net directory and handles any network interactions through it. All pathnames of the remote nodes will appear under this directory and you can manage their files and processes as if they were on your local machine.
We can use this nice feature for our needs. For example if we can run processes on the remote nodes as on our own, we can create a script, which can use useful utilities from our node and run them over Qnet on these not-so-functional remote nodes. But such approach also has one drawback: if we’re going to execute some script on the remote machine over Qnet, we need to write two separate scripts (like client-server) and one main script will execute another script on some remote nodes (the other script should already be there), which is not so good decision, because it is not guaranteed we can place any third-party script on that remote nodes. But we can go even further with Qnet magic and execute our own deployment script on another node using the “on” utility. The “on” utility is used to execute a command on another node or terminal. We’ll use it to execute a script on the network nodes.
    So the deployment process will look like our script is executing itself over the network on the remote node with different parameters. Kind of network recursive execution or boomerang. Utility “on” has a bunch of parameters like logging in as specified user on a remote node before executing a command, setting command priority, opening the specified terminal and some others.

Deployment script

    The deployment script will have two modes: master mode for the node it is executed on and slave mode for the network nodes. The generic template for such deployment script can look like this:

if [ "$SLAVE_MODE" -eq "0" ]; then
       # MASTER MODE

    SCRIPT_PATH=$( cd -P -- "$(dirname -- "$(command -v -- "$0")")" && pwd -P )
    SCRIPT_NAME="${0##*/}"
    NETWORK_SCRIPT_PATH="/net/${HOSTNAME}${SCRIPT_PATH}/${SCRIPT_NAME}"

    if [ -z "$NODES_TO_UPDATE" ]; then
        NODES_TO_UPDATE=`ls /net/`
    else
        NODES_TO_UPDATE=$( split_string "$NODES_TO_UPDATE" )
    fi


    for node in $NODES_TO_UPDATE; do
        REMOTE_COMMAND="$NETWORK_SCRIPT_PATH --slave -p $PACKAGES"

        on -f $node sh -c "$REMOTE_COMMAND" &
    done

    echo "Waiting for all nodes..."
    wait
    echo "Deployment finished"

else
    # SLAVE MODE

    for package in $PACKAGES_TO_UPDATE; do
        install $package
    done
fi


    We have SLAVE_MODE variable which is false when we run this script on master node and is true when it’s executed recursively over the network. One of the cornerstones to build such deployment system is to have a correct network path to the script itself, because it will be executed in quite unusual way. NETWORK_SCRIPT_PATH defines such correct network path to the script. Then, I assume, we’ve passed list of nodes we want to update by parameters to the script in master mode. If no, we can always grab all available nodes from /net directory. Next step is to run our script using the “on” utility on each node from this list of nodes. We can add an ampersand to the “on” command in order to continue execute our master script while each slave can do it’s job in the background. After all slave processes are spawned we can wait their termination using a wait command. When this script is executed on the remote node in a slave mode it gets the list of packages to update by parameter and just loops it and processes each package somehow.
    We can also add some deployment verification procedure for consistency reasons. We can generate some token, say datetime, and save it in the deployment directory or user home folder. In the master mode we can loop nodes one more time to check whether deployed version is correct. In the slave mode we can skip update if deployed version is already the most recent and update version after the packages installation loop finishes successfully.
    Also if we want to run some utils over the network, we can pass to slave mode a path to binaries on a node where the script in master mode is executed like this:

MASTER_BIN_PATHES="/net/$HOSTNAME/bin:/net/$HOSTNAME/usr/bin"
...
REMOTE_COMMAND="$NETWORK_SCRIPT_PATH --slave --additional-path=$MASTER_BIN_PATHES -p $PACKAGES"


    And use it in the slave mode:

if [ ! -z "$ADDITIONAL_PATH" ]; then
    export PATH="$PATH:$ADDITIONAL_PATH"
fi


    Or to use direct path over the network to needed utilities:

NET_TAR="$MASTER_BIN_PATH/tar"
$NET_TAR -xzf "$PACKAGE_PATH" -C "$INSTALL_DIR"


    We can improve existing solution in a number of ways:
  • we can use some helper script to retrieve packages to update from our build server if we have one
  • add some parameter to master mode to force update all nodes in case of broken installations (with correct deployment file and broken binaries)
  • add some pre-install and post-install hooks to the slave mode

Conclusion

   This is the last approach for deployment system - to develop it by yourself. In some cases the restrictions can make this process a bit challenging as we can see in the case of bare QNX installation. But, on the other hand, we can use unique QNX technologies to solve it efficiently. 


Continuous Integration with TeamCity - preparing deployment package

In this post we’ll discuss how one can create deployment package with the help of TeamCity. And do we need TeamCity to create deployment package? What feature and benefits TeamCity provides and what are the downsides of these “benefits”?

prepare-deployment-package configuration

First we need to define what deployment package is. It can also be named “installation package”. We'll understand under deployment package a bunch of application binaries and installation logic (e.g. shell scripts) required to deploy these binaries to target environment. On our project deployment package contained ZIP files with applications and PowerShell/bash deployment scripts.
Suppose you have a Visual Studio solution with multiple projects (app1, app2, service1):

You've already set up configuration to build the solution:


Let’s assume deployment envisions installing applications on several machines within local network. Some apps/services must be installed on MachineA, other – on MachineB. You want your applications to be in a separate ZIP files so only required ones can be copied on target machines. Let’s create TeamCity configuration that packs app1 binaries into zip file. On Project1-master home page click Edit Project Settings link then click Create build configuration link. Name configuration as pack-app1:
…

Proceed to VCS settings page. Attach VCS root which references repository that contains app1 source code (VS solution source code). In VCS checkout mode select Do not checkout files automatically. VCS root is required only to enable TeamCity to show source code changes history for every pack-app1 configuration run. If you are not interested in this history you can do nothing on VCS root attaching step.
Proceed to Add Build Step page. You do not need any build steps, so click Save and remove created Ant build step.
Navigate to Dependencies page:

Add new snapshot dependency.


Add new artifact dependency.

Oh, TeamCity says that build #2 of build-solution-release configuration does not contain artifacts. View build-solution-release configuration home page:
Indeed no artifacts. Let’s check build-solution-release General Settings:

Of course – this configuration does not publish any artifacts yet. You may ask what artifacts are and why configuration may want to publish them? Using simple words, artifacts are set of files produced as a result of configuration run. These files may be passed as arguments to other TeamCity configurations, like arguments can be passed from function to function in programming language.
What files build-solution-release configuration produces? It produces binary code files – result of Visual Studio solution build process. Binaries for app1 application most probably reside in app1\bin\Release subfolder. Let’s edit Artifacts paths and set its value to *\bin\Release\**

Wildcards in path are intuitive. Basically we want to publish binaries for app1, app2 and service1 and we know that all apps reside in a root directory of the repository. So following directories will be published:
  app1\bin\Release
  app2\bin\Release
  service1\bin\Release

Rerun build-solution-release configuration:

Perfect. Now build-solution-release configuration publishes compiled binaries! Let’s return to Dependencies screen of pack-app1 configuration. Click Add new artifact dependency link once again:

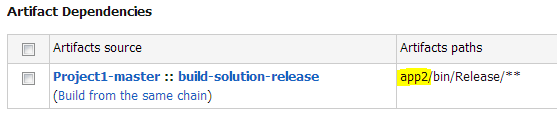
Ensure Build from the same chain is selected in Get artifacts from field. To retrieve only app1 binaries (instead of all apps binaries) enter app1/bin/Release/** in Artifacts path field (yes, you can use back or forward slashes). Save.
Ok, artifact dependency allows pack-app1 configuration to get files from build-solution-release configuration. But why we also added snapshot dependency? Snapshot dependency ensures that pack-app1 build will start only after the one it depends on (build-solution-release) is run and finished. Without snapshot dependency pack-app1 will never trigger build-solution-release configuration, thus via artifact dependency we could reference old app binaries.
Now when you run pack-app1 configuration it will trigger build-solution-release run (or will not if it is up-to-date), get from build-solution-release files located at app1/bin/Release path and put them into its home directory (each configuration has its unique home directory). Let’s publish app1 binaries as app1.zip file:

Run pack-app1 configuration again and ensure it does have app1.zip as its artifacts:

Using similar steps create pack-app2 and pack-service1 configurations. Tip: to save time go to pack-app1 configuration settings page and click Copy. Change name to pack-app2:

Edit artifacts dependencies – change app1 to app2:

On General Settings change app1.zip to app2.zip:

Done! Do the same for pack-service1.
Now let's create pack-deployment-scripts configuration. This configuration will not depend on build-solution-release but will instead take deployment scripts directly from source repository. In VCS checkout mode select Automatically on server (Checkout rules work only if this mode is selected). Click edit checkout rules and in Edit Checkout Rules dialog, enter +:deployment. This rule will inform TeamCity that we want to checkout only one folder from our VCS – root-located deployment folder.

Finally we have all necessary deployment components:

You can run only required configuration (say pack-app2) and download ready to run application binaries.
As a final step we’ll create prepare-deployment-package configuration which will merge artifacts from all previously created pack configurations. This configuration shall not checkout source code from VCS. Setup snapshot and artifacts dependencies in a following way:

On General Settings:

Now run the configuration:

Click View and download deployment package to your local machine:

After download has completed you can run .\deployment\deploy.ps1 script to deploy your application. Alternatively, you may create new TeamCity configuration, for example deploy-to-local-data-center; use artifact dependencies from prepare-deployment-package configuration, create build steps that invokes .\deployment\deploy.ps1 script and watch how TeamCity does the job.

Pros and cons of preparing deployment package with TeamCity

Described solution works fine. It uses TeamCity features to compress files into zip archive and to place them into necessary locations on a disc.
Still it also has issues that you should be aware about. First, we’ve introduced quite a lot of new configurations: pack-app1, pack-app2, pack-service1, pack-deployment-scripts. If your solution has more products to deploy, number of configurations will be even higher. From our experience supporting such zoo of configurations may become a tedious and hard task, especially if you have many copies of TeamCity Prooject1 for different VCS branches.
Besides, you probably cannot use this approach with free version of TeamCity, because it does not allow having more than 20 configurations per project.
To minimize number of configurations you may create single pack-products configuration instead of having three ones. Its Dependencies and General Settings may be as following:

General Settings:

Published artifacts:

You may also omit zipping step in pack configuration and perform it only in prepare-deployment-package configuration. But keep in mind, that in case you have several TeamCity build agents and your products contain large amount of files (e.g. help files), transferring them over network may become a performance bottleneck.
And now meet the most obvious and important issue: you cannot create your deployment package without TeamCity! What is worth, because TeamCity projects and configurations are not kept under VCS, preparing deployment package for older revisions of your solution is almost impossible task (they quickly get out of sync since TeamCity has logic for latest revision only).

One day customer requested us to provide source code and instructions how to build it. They wanted to build and deploy product by themselves. This was the final argument against using TeamCity to completely control source code build and deployment package preparation processes. We decided to implement everything in shell scripts (PowerShell, bash) and use TeamCity as dump scripts runner.  Build configuration simply call one PowerShell script to build all projects and another PowerShell script to organize binaries into deployment package:

Publish prepared by PowerShell script deployment package and you are done:

In case you have to prepare deployment package for older version of your project – just checkout to older revision and run appropriate scripts.

Conclusion

TeamCity provides nice set of feature for building your project and packing result binaries into deployment package. You can use them to get a quick start (of course if you already have some experience with these features). But keep in mind that TeamCity is not a Holy Grail of continuous integration process. Having 100% dependency on TeamCity is not good. There might be a moment when you have to build and package your project without TeamCity. So try to create stand-alone build scripts and use TeamCity only for calling these scripts when certain events occur (new commit, time schedule, user request, etc.).
What TeamCity does really well is running automated tests and reporting their status. We’ll talk about this topic in following posts.

9/25/2013

Continuous Integration with TeamCity – supporting multiple branches

Everybody will agree that nowadays Continuous Integration (CI) process established on project is as usual as Version Control System (VCS) for source code. Actually both are tightly coupled – CI server takes source code from VCS and runs all the pre-configured by build engineer magic: source code compilation, automated tests run, installation package preparation, etc.
Here at ELEKS we get used to TeamCity. In this and following posts I’ll share our experience with using TeamCity. When mentioning VCS I’ll refer to Git. Still, most of described also apply to Subversion and other VCS.
First common problem that we'll discuss – establishing CI process for multiple branches of source code: usually for development and release branches.

The beginning

Development is started. Source code repository setup completed. After several days of development, when there is something to build, we add a TeamCity Project and several configurations to this Project:
Time flows; more code is being committed into source control. More TeamCity configurations are being added:
After half a year of development we already have 40 configurations. These configurations were created and evolved together with source code. Because all the time we worked only on single development branch (called master) everything was simple and fine. But now we have to make code-freeze and introduce a release branch which brings new problems to solve:
  1. We have to run continuous integration process for both master and release branches.
  2. From time to time we have to merge fixes from release branch into master branch and vise-versa.

Continuous Integration for release branch

For a single branch we had 40 TeamCity configurations. For two branches we must have 40 + 40 = 80 ones. Or can we have only 40 configurations but run them either for master or release branch? Short answer: we didn’t find a reliable way how to do this. Besides, it is nice to have configurations for different branches running in parallel and for this feature we must have a copy of these configurations so each branch can be independent. 
How can we quickly get these 40 extra configurations? At the time we make a release branch from master branch it is obvious that they must be the exact copy of existing 40 configurations developed for master branch. Thankfully, TeamCity offers a way to clone whole Project with all its configurations.
Before cloning Project1 project make sure that VCS root referenced by configurations of this project is shared. Look at the bottom of Edit VCS Root page:
Now go to Project1 settings:

Click Copy:
Name new project as Project1-release and confirm. Rename old Project1 to Project1-master.

At this point Project1-release is the exact copy of Project1-master. The last thing to do is to change VCS root branch. Click on any configuration in Project1-release (for example on build-app-debug), click Edit Configuration Settings and select Version Control Settings:
Edit VCS root – change VCS root name to repo-release and Ref name to release (Ref name stands for branch name there). Scroll to the very bottom of Edit VCS Root page:
Make sure “Apply to all templates & configurations of Project1-release project where this VCS root is used (a copy of this VCS root will be created)” option is selected! Click Save.
Now all configurations from Project1-release project have VCS root that points to release branch. If you have more than one source code repository, for example you are using git sub-modules, you have to perform VCS root editing steps for each VCS root.
Please note that described technique works as long as all your configurations reside within single TeamCity Project! If, for some reason, you split configurations between two TeamCity Projects (say Project1-build and Project1-tests) – you are in trouble when applying copy project technique, especially if you have more than one VCS root.
Congratulations. We have two TeamCity projects and two VCS roots, each references different code branch. We can commit code either to master or release branch and run corresponding TeamCity configurations in parallel (...if you have multiple Build Agents, otherwise they’ll be queued).
Of course having two almost exact clones of TeamCity configurations doesn’t feel “right”. But it works!

New development and new release

First version of the product released. Developers continue to work on master branch. They add new code, write new tests. As a result more TeamCity configurations are created; some existing configurations are changed (extra build step added, some steps changed, new artifacts dependencies used, etc.). Master branch and Project1-master TeamCity project are evolving together – when some TeamCity configuration is broken build engineer fixes it. What is important is all this evolving process – source code is under source control but your TeamCity projects and configurations are not.
Sometimes we make fixes to release branch. Usually these are only bug-fixes, no new functionality is introduced – no reason to touch Project1-release configuration.
Three months later a new release comes. Team lead merges code from master branch into release branch and… a lot of configurations in Project1-release project do not work! Moreover, some configurations are missing. Of course they are missing – they were added to Project1-master but not to Project1-release.
Here is the most simple and reliable way of fixing Project1-release – just remove it and create a new copy of Project1-master! But consider following side effects: Project ID, Configurations IDs and VCS root IDs will change. If your automation tools rely on these IDs you have to reconfigure these tools. Actually, these are ways to preserve VCS root IDs – the most quick and reliable solution envisions manual editing of TeamCity project XML configuration file and TeamCity server restart. 
Alternatively you may reapply changes made in Project1-master to Project1-release manually using TeamCity WEB interface. But if number of changes is high the work quickly becomes tedious and error prone.

Conclusion

In this post we reviewed one of the possible ways of supporting CI process for multiple branches of source code. I do not say that described approach is ideal and you should immediately start using it; I blogged about it because it worked (and works) well on rather large project. We tried other ways of achieving flawless multiple branches CI – for example using TeamCity templates feature. But time showed that “clone whole project and VCS roots approach” is the most optimal solution by complexity/features criteria. If you’ve successfully applied "better" solution that solves multiple branches support issue – please share it in comments.