Showing posts with label Java. Show all posts

4/08/2014

Google Glass in Warehouse Automation

Imagine that you operate a huge warehouse, where you store all the awesome goods you sell.
Well, one of our customers does.
For instance, if you run a supermarket, your process consists of at least these major modules:
  1. Online order management & checkout.
  2. Order packaging.
  3. Incoming goods processing and warehouse logistics.
  4. Order delivery.
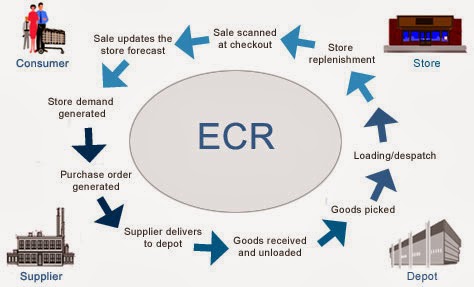
Here's an oversimplified picture of your flow:
Modern Supply Chain
Source: http://www.igd.com/our-expertise/Supply-chain/In-store/3459/On-Shelf-Availability

If you relax for a minute, you could probably brainstorm several ideas of how Google Glass can be applied in warehouse.
But let's focus on 1 link on that picture: "Goods received and unloaded". If you break it down into pieces, it seems to be a rather simple process:
  1. Truck comes to your warehouse.
  2. You unload the truck.
  3. Add all items into your Warehouse Management system.
  4. Place all items into specific place inside the warehouse.
But it gets complicated, when you need to enter specific data manually: expiry dates, amount, etc. We thought about optimizing person's performance during this phase. Would it be great, if you could just
  1. pick a box with both of your hands
  2. handle it to the shelf
  3. go back to the truck & repeat
On one hand, you have some spare seconds, when you grab a box and handle it. On the other, Google Glass has camera and voice recognition.

We combined both of the approaches. And that's what we created:


Pretty cool, yeah? Here you can see automation of all basic tasks we mentioned above. It is incredible how useful Google Glass is for warehouse automation.

In the next section we're going to dive deep into technical details, so in case you're software engineer you can find some interesting pieces of code below.

Working with Camera in Google Glass

We wanted to let person grab a package and scan it's barcode at the same time. First of all, we tried implementing barcode scanning routines for Glass. That's great that Glass is actually an Android device.
So, as usual, add permissions to AndroidManifest.xml, initialize your camera and have fun.
<uses-feature android:name="android.hardware.camera" />
<uses-feature android:name="android.hardware.camera.autofocus" />

<uses-permission android:name="android.permission.CAMERA" />
<uses-permission android:name="android.permission.RECORD_AUDIO" />
But wait, what the hell is going on? Why does my screen shows something similar to this:


Glass is a beta product, so you need some hacks. When you implement surfaceChanged(...) method, don't forget to add parameters.setPreviewFpsRange(30000, 30000); call. Eventually, your surfaceChanged(...) should look like this:

public void surfaceChanged(SurfaceHolder holder, int format, int width, int height) {
    ...
    Camera.Parameters parameters = mCamera.getParameters();
    Camera.Size size = getBestPreviewSize(width, height, parameters);
    parameters.setPreviewSize(size.width, size.height);
    parameters.setPreviewFpsRange(30000, 30000);
    mCamera.setParameters(parameters);

    mCamera.startPreview();
    ...
}
That's the way you can make it work.
P.S. Unfortunately, Glass has now just 1 focus mode -- "infinity". I hope, things will get better in the future.

Working with Barcodes in Google Glass

Once you see a clear picture inside your prism, let's proceed with barcode scanning. There're some barcode scanning libraries out there: zxing, zbar, etc. We grabbed a copy of zbar library and integrated it into our project.
  1. Download a copy of it.
  2. Copy armeabi-v7a folder and zbar.jar file into libs folder of your project.
  3. Use it with camera:
Initialise JNI bridge for zbar library:
static {
    System.loadLibrary("iconv");
}
Add to onCreate(...) of your activity:
setContentView(R.layout.activity_camera);
// ...
scanner = new ImageScanner();
scanner.setConfig(0, Config.X_DENSITY, 3);
scanner.setConfig(0, Config.Y_DENSITY, 3);
And create Camera.PreviewCallback instance like this. You'll scan image and receive scanning results in it.
Camera.PreviewCallback previewCallback = new Camera.PreviewCallback() {
    public void onPreviewFrame(byte[] data, Camera camera) {
        Camera.Size size = camera.getParameters().getPreviewSize();

        Image barcode = new Image(size.width, size.height, "NV21");
        barcode.setData(data);
        barcode = barcode.convert("Y800"); 
        int result = scanner.scanImage(barcode);

        if (result != 0) {
            SymbolSet syms = scanner.getResults();
            for (Symbol sym : syms) {
                doSmthWithScannedSymbol(sym);
            }
        }
    }
};
You can skip barcode.convert("Y800") call and scanner would still work. Just keep in mind that Android camera returns images in NV21 format by default. zbar's ImageScanner supports only Y800 format. That's it. Now you can scan barcodes with your Glass :)

Handling Voice input in Google Glass

Apart from Camera, Glass has some microphones, which let you control it via voice. Voice control looks natural here, although people around you would find it disturbing. Especially, when it can't recognize "ok glass, google what does the fox say" 5 times in a row.
As you can remember, we want to avoid manual input of specific data from packages. Some groceries have expiry date. Let's implement recognition of expiry date via voice. In this way, a person would take a package with both hands, scan a barcode, say expiry date while handling a package and get back to another package.
From technical standpoint, we need to solve 2 issues:
  1. perform speech to text recognition
  2. perform date extraction via free-form text analysis
Task #1 can be solved via Google Speech Recognition API in Android. In order to use it from Glass, you need to use default Android Intents:
Intent intent = new Intent(RecognizerIntent.ACTION_RECOGNIZE_SPEECH);   
intent.putExtra(RecognizerIntent.EXTRA_PROMPT, "Say expiry date:");   
startActivityForResult(intent, EXPIARY_DATE_REQUEST);
And override onActivityResult(...) in your Activity, of course:
@Override
protected void onActivityResult(int requestCode, int resultCode, Intent data) {
    if (resultCode == Activity.RESULT_OK && requestCode == EXPIARY_DATE_REQUEST) {
        doSmthWithVoiceResult(data);
    } else {
        super.onActivityResult(requestCode, resultCode, data);
    }
}

public void doSmthWithVoiceResult(Intent intent) {
    List<String> results = intent.getStringArrayListExtra(RecognizerIntent.EXTRA_RESULTS);
    Log.d(TAG, ""+results);
    if (results.size() > 0) {
        String spokenText = results.get(0);
        doSmthWithDateString(spokenText);
    }
}
Once we have free-form text from Google Voice Recognition API we need to solve task #2: get contextual information from it. We need to understand, which date is hidden behind phrases like:
  • in 2 days
  • next Thursday
  • 25th of May
In order to do this, you can either write your own lexical parser, or find a third-party library for that. Eventually, we found an awesome library called natty. It does exactly this: it is a natural language date parser written in Java. You can even try it online here.
Here's how you can use it in your project. Add natty.jar to your project. If you use maven, then add it via:
<dependency> 
    <groupId>com.joestelmach</groupId>
    <artifactId>natty</artifactId>
    <version>0.8</version>
</dependency>
If you just copy jars to your libs folder you'll need natty with dependencies. Download all of them:
  • stringtemplate-3.2.jar
  • antlr-2.7.7.jar
  • antlr-runtime-3.2.jar
  • natty-0.8.jar
And use Parser class in your source:
// doSmthWithDateString("in 2 days"); 

public static Date doSmthWithDateString(String text) {
    Parser parser = new Parser();
    List<DateGroup> groups = parser.parse(text);
    for (DateGroup group : groups) {
        List<Date> dates = group.getDates();
        Log.d(TAG, "PARSED: " + dates);
        if (dates.size() > 0) {
            return dates.get(0);
        }
    }
    return null;
}
That's it. natty does a pretty job of transforming your voice into Date instances.

Instead of Summary

Glass is an awesome device, but it has some issues now. Even though it's still in beta, you'll get tons of joy, while developing apps for it! So grab a device, download SDK and have fun!
P.S. You can find full source code for this example here: https://github.com/eleks/glass-warehouse-automation.

12/16/2013

Introduction to Android NDK

Introduction


To develop applications for Android OS, Google offers two development packages: SDK and NDK. There are many articles and books as well as good guidelines from Google about SDK. But even Google does not provide enough materials about NDK. Among all the existing books, I would like to single out only this one, “Cinar O. - Pro Android C++ with the NDK – 2012.” 
This article is intended for those with a lack of (or some) background in Android NDK who would like to strengthen their knowledge. I will pay attention to JNI. It seems to me that I have to start just from this interface. Also, at the end, we will review a short example with two functions of file writing and reading.

What is Android NDK?


Android NDK (Native Development Kit) is a set of tools that allows you to implement a part of your application using such languages as С/С++.

When to use the NDK?


Google recommends using NDK only in rare cases. Usually, these cases are the following:
  • Necessity to increase performance (e.g. sorting of large data volumes);
  • Use of a third-party library. For example, many applications are written in the С/С++ languages and it is necessary to use the existing material. Examples of such libraries are Ffmpeg, OpenCV;
  • Programming on low level (for example, everything what goes beyond Dalvik).

What is JNI?


Java Native Interface is a standard mechanism for code execution under control of the Java Virtual Machine. The code is written in Assembler or С/С++ and assembled as dynamic libraries. It allows for the non-usage of the static binding. This provides an opportunity to call a С/С++ function from the program on Java and vice versa. 

JNI Advantages


The main competitive advantage of JNI compared to its analogues (Netscape Java Runtime Interface or Microsoft’s Raw Native Interface and COM/Java Interface) is that it was initially developed for ensuring binary compatibility, for compatibility of applications written for JNI, for any Java virtual machines on the concrete platform (while speaking about JNI, I do not mean the Dalvik machine as JNI was written by Oracle for JVM which is suitable for all Java Virtual Machines). That is the reason the compiled code on С/С++ will be executed regardless of platform. Earlier versions did not allow for the implementation of binary compatibility.   
Binary compatibility is a program compatibility type. It allows a program to work in different environments without changing its executable files.

Organization of JNI


Figure 1. – JNI – Interface pointer
The JNI table is organized like a table of virtual functions in С++. The VM can work with several such tables. For example, one will be for debugging, the other for usage. The JNI interface pointer is only valid in the current thread. This means that the pointer cannot move from one thread into another. However, native methods can be called from different threads.
Example:
jdouble Java_pkg_Cls_f__ILjava_lang_String_2 (JNIEnv *env, jobject obj, jint i, jstring s)
{
     const char *str = (*env)->GetStringUTFChars(env, s, 0); 
     (*env)->ReleaseStringUTFChars(env, s, str); 
     return 10;
}
  • *env – an interface pointer;
  • оbj – a reference to the object inside which the native method is declared;
  • i and s – passed arguments;

Primitive types are copied between the VM and native code and objects are passed by the reference. The VM should trace all references that are passed to native code. GC cannot free all references passed to native code. But at the same time native code should inform the VM that it does not need references for passed objects.

Local and Global References


JNI defines three reference types: local, global and weak global references. Local ones are valid until the method is finished. All Java objects returned by JNI functions are local references. A programmer should hope that the VM would clean all local references. Local references are available only in the thread where they were created. However, if it is necessary they can be freed at once using DeleteLocalRef the JNI method of the interface:

jclass clazz;
clazz = (*env)->FindClass(env, "java/lang/String");
...
(*env)->DeleteLocalRef(env, clazz);

Global references remain valid until they are explicitly freed. To create a global reference you have to call a NewGlobalRef method. If the global reference is unnecessary, then it can be deleted by the DeleteGlobalRef method:

jclass localClazz;
jclass globalClazz;
...
localClazz = (*env)->FindClass(env, "java/lang/String");
globalClazz = (*env)->NewGlobalRef(env, localClazz);
...
(*env)->DeleteLocalRef(env, localClazz);

Errors


JNI does not check for errors such as NullPointerException, IllegalArgumentException. Reasons:

  • decrease in performance;
  • in the most C libraries functions, it is very difficult to be protected from errors.

JNI allows for the usage of Java Exception. Most JNI functions return an error code but not Exception itself. Therefore, it is necessary to handle the code itself and throw Exception to Java. In JNI, the error code of the called functions should be checked and after that ExceptionOccurred() should be called to return an error object: 

jthrowable ExceptionOccurred(JNIEnv *env);

For example, some JNI functions of access to arrays don’t return errors. But they can call the exception ArrayIndexOutOfBoundsException or ArrayStoreException.

JNI Primitive Types


In JNI exists its own primitive and reference types of data.
Table 1. Primitive types.
Java TypeNative TypeDescription
booleanjbooleanunsigned 8 bits
bytejbytesigned 8 bits
charjcharunsigned 16 bits
shortjshortsigned 16 bits
intjintsigned 32 bits
longjlongsigned 64 bits
floatjfloat32 bits
doublejdouble64 bits
voidvoidN/A

JNI Reference Types 


Figure. 2 – JNI reference types

Modified UTF-8


The JNI uses modified UTF-8 strings to represent different string types. Java uses UTF-16. UTF-8 is mainly used in C because it encodes \u0000 as 0xc0, instead of the usual 0x00. Modified strings are encoded so that character sequences that contain only non-null ASCII characters can be represented using only one byte.  

JNI Functions: 


The JNI interface includes not only its own dataset but also its own functions. It will take a lot of time to review the dataset and functions since there are plenty of them. You can find out more information from the official documentation: http://docs.oracle.com/javase/6/docs/technotes/guides/jni/spec/functions.html

Sample of using JNI functions 


Below you will find a short example in order to make sure that you have correctly understood the material covered:

#include <jni.h>
    ...
JavaVM *jvm;
JNIEnv *env;
JavaVMInitArgs vm_args;
JavaVMOption* options = new JavaVMOption[1];
options[0].optionString = "-Djava.class.path=/usr/lib/java";
vm_args.version = JNI_VERSION_1_6;
vm_args.nOptions = 1;
vm_args.options = options;
vm_args.ignoreUnrecognized = false;
JNI_CreateJavaVM(&jvm, &env, &vm_args);
delete options;
jclass cls = env->FindClass("Main");
jmethodID mid = env->GetStaticMethodID(cls, "test", "(I)V");
env->CallStaticVoidMethod(cls, mid, 100);
jvm->DestroyJavaVM();

Let’s analyze by string:

  • JavaVM – provides an interface for calling functions which allows for the creation and removal of JavaVM;
  • JNIEnv – ensures most of the JNI functions;
  • JavaVMInitArgs – arguments for JavaVM;
  • JavaVMOption – options for JavaVM;

The JNI_CreateJavaVM() method initializes JavaVM and returns a pointer to the JNI interface pointer.
JNI_DestroyJavaVM() method loads the created JavaVM. 

Threads 


The kernel manages all the threads running on Linux; still they can be attached to the JavaVM via functions AttachCurrentThread and AttachCurrentThreadAsDaemon. If the thread is not attached, it has no access to JNIEnv. Android doesn’t stop the threads created from JNI, even if the GC is running.  The thread remains attached until it calls for the DetachCurrentThread method to detach itself from JavaVM.

First Steps


The structure of your project should look as is shown in Figure 3:
Figure. 3 – Project Structure
As Figure 3 shows, all the native code is stored to a jni folder. After a project build, the Libs folder should be separated into four subfolders. It means, one separate native library for each processor architecture. The quantity of libraries depends on the quantity of architectures selected. 
To create a native project, create a mere Android project and follow the steps: 
  • Create a jni folder –  project sources root folder with native code sources;
  • Create an Android.mk to build a project;
  • Create an Application.mk to store compilation details. It is not required but is recommended as it allows for flexible compilation setting;
  • Create an ndk-build file that will launch the compilation process (also not required).

Android.mk


As it was mentioned before, Android.mk is a makefile for native project compilation. Android.mk is used to group your code into modules. Under modules I mean statistic libraries, copied into the libs folder of your project, shared libraries and standalone executable.
Example of minimal configuration:

LOCAL_PATH := $(call my-dir)
include $(CLEAR_VARS)
LOCAL_MODULE    := NDKBegining
LOCAL_SRC_FILES := ndkBegining.c
include $(BUILD_SHARED_LIBRARY)

Let’s take a detailed look at:

  • LOCAL_PATH := $(call my-dir) – function call my-dir is used to return the path of the folder the file is called in;
  • include $(CLEAR_VARS) - cleans all the variables except LOCAL_PATH. It’s necessary to take into account as all the files are compiled in a single GNU Make context where all the variables are global;
  • LOCAL_MODULE – The name of the output module. In the above-mentioned example, the output module name is set as NDKBegining, but after the build, libNDKBeginin libraries are created in the libs folder. Android adds a lib prefix to the name, but in java code you should indicate the library name without a prefix (that is, the name should be the same as in makefiles);
  • LOCAL_SRC_FILES – listing source files to be built;
  • include $(BUILD_SHARED_LIBRARY) points type of the output module.
One may set custom variables in Android.mk; however they must stick to the following syntax: LOCAL_, PRIVATE_, NDK_, APP_, my-dir. Google recommends naming custom examples as MY_. For example:

MY_SOURCE := NDKBegining.c

To call a variable $(MY_SOURCE)
Variable can also be concatenated, for example:

LOCAL_SRC_FILES += $(MY_SOURCE)

Application.mk


This makefile defines several variables that make compilation more flexible:

  • APP_OPTIM – optional variable which is set either to release or debug. This variable is used for optimization when building an application's modules. You may manage release as debug; however debug gives more information for settings;
  • APP_BUILD_SCRI defines an alternate path to Android.mk;
  • APP_ABI – is probably one of the most essential variables. It specifies target processor architecture to compile the modules. By default, APP_ABI is set to 'armeabi', which corresponds to ARMv5TE architecture. For example, to support ARMv7, armeabi-v7a should be used; for IA-32– x86, for MIPS – mips, whereas for multiple architectures support, you should set APP_ABI := armeabi armeabi-v7a x86 mips. With NDK revision 7 and higher, you can simply set APP_ABI := all  rather than enumerating all the architectures. 
  • APP_PLATFORM – names a target platform;
  • APP_STL Android provides a very minimal libstdc++ runtime library so a developer is limited in using C++ functionality. However, APP_STL variable enables support for the extended functionality; 
  • NDK_TOOLCHAIN_VERSION – enables the selection of a GCC compiler version (which, by default, is set to 4.6)

NDK-BUILDS


ndk-build is a wrapper around GNU Make.
After the 4th revision, flags were implemented for ndk-build: 
  • clean – cleans all the generated binary files;
  • NDK_DEBUG=1 – generates a debuggable code;
  • NDK_LOG=1 – displays log messages (is used for debugging);
  • NDK_HOST_32BIT=1 – Android supports 64-bit utilities version (for example, NDK_PATH\toolchains\mipsel-linux-android-4.8\prebuilt\windows-x86_64, etc. );
  • NDK_APPLICATION_MK=<file> – indicates path to Application.mk.
In NDK revision 5, the NDK_DEBUG flag was introduced. When it is set to “1” the debug version will be built. If the flag is not set, the ndk-build by default will verify whether the attribute android:debuggable="true" is set in AndroidManifest.xml. If you are using NDK above revision 8, Google does not recommend using attribute android:debuggable in AndroidManifest.xml. (As you are using “ant debug” or building the debug version by the means of and ADT plug-in, the NDK_DEBUG=1 flag will be added automatically). 
By default, support of a 64-bit utilities version is set; however, you can force the use of a 32-bit toolchain by using NDK_HOST_32BIT=1. Still, Google recommends using 64-bit utilities to improve performance of the large programs. 

How to build a project?


It used to be a painful process. You would install CDT plug-in and download cygwin or mingw compiler; download Android NDK; configure all this stuff in Eclipse settings; and finally, it won’t work. The first time I started working with Android NDK, it took me three days to configure all these things. The problem was in Cygwin: the permission 777 should have been set to the project folder. 
Now it’s much easier. Just follow this link http://developer.android.com/sdk/index.html and download the ADT Bundle, which provides everything you need to start compiling. 

Invoke the native methods from Java code


To call native code from Java, first of all you need to define native methods in Java class. For example: 

native String nativeGetStringFromFile(String path) throws IOException;
native void nativeWriteByteArrayToFile(String path, byte[] b) throws IOException;

You should put the reserved word “native” before the method. In such a way, the compiler knows that this is an entry point in the JNI. These methods should be implemented in C/C++ files. Google also recommends starting naming methods with nativeX, where X stands for the method’s actual name.  Still, before implementing these methods manually you should generate a header file. You can perform this action either manually or using a JDK javah utility. Let’s take it a step further and not run it from the console, but rather by the standard Eclipse means.

  • Go to Eclipse and select Run-External Tools-External Tools Configuration;
  • Create new configuration;
  • Indicate the path to javah.exe from jdk in Location field (for example, C:\Program Files (x86)\Java\jdk1.6.0_35\bin\javah.exe);
  • Indicate the path to the directory bin/classes (for example, «${workspace_loc:/NDKBegin/bin/classes}») in the working directory;
  • Arguments should be populated with the following argument: “-jni ${java_type_name}” (with no inverted commas).

Now we can run it. Your header files will be stored in the bin/classes directory. 
As a next step, copy these files into the jni directory of the native project. Next, open the project’s context menu and select Android Tools – Add Native Library. This allows us to use jni.h functions. Later on you can create a cpp file (sometimes Eclipse creates it by default) and write methods bodies that have been defined in the header file.   
You won’t find here a sample of code, as I haven’t inserted it on purpose, for the sake of the article’s length and readability.  Please follow the link on GitHub if you need an example https://github.com/viacheslavtitov/NDKBegining


12/10/2013

JSP Tag Library with Scala (taglib resurrection userguide)

Introduction

“What is dead may never die!”
―  George R. R. Martin, A Song of Ice and Fire

One can argue over what is dead and what is not for a long time. You can argue over anything, the main question is: is it worth doing that when you need to act? Necromancy has always been condemned, and that is actually right. But the cases are different. What would you do when you need the ‘dead’ to go?


JSTL overview

JSP Tag Library is a means of encapsulation of certain actions, which can be applied in Java Server Pages. Also, it should be mentioned that this is an effective means of code reusability, because the created tags can be used multiple times. And those are the things that may be very useful for Java developers working on the web.
It is worth noting that the library of custom tags is not quite a specific thing, but a logical supplement to JSP Standard Tag Library (although it may be vice versa). In fact, it would be strange to call something standard if there was not something non-standard. By the way, somehow it happened that when I heard about TagLib, I was not familiar with JSTL and immediately thought: "Aha, dear foreach, now I'll implement you once and for all," but it turned out that it had been already done before me (I cannot say I was very upset). That is why, not to reinvent the wheel, TagLib should be considered from the JSTL view.
To put it mildly, JSTL is an ancient technology, it appeared as early as in Java 1.4, so, if you are interested in details, the manuscripts documentation is always at your disposal. In turn, I will just give a quick overview of the things I’ve found interesting.
Thus, the standard tag library consists of several groups separated by functionality that is implemented by their components.
Core Tags
This group contains expression tags, remove tags (removing scoped variables), conditional tags, the already mentioned forEach, the redirect tag and some more tags the information about which you can find out by yourself.
Formatting tags
This group contains tags used for formatting and output of date, time and text, as well as tags dealing with localization from resources, such as the timeZone tag.
SQL tags
Hmm, don’t even know what to add. In general, the name of this group and <query>, <update> and <transaction> tags should speak for themselves.
XML tags
Pretty much the same as Core tags, but for XML. Except perhaps for the parse tag used to parse XML data from attribute or from tag body.
JSTL functions
These are not exactly tags. Or rather, these are not tags at all. This is just a set of functions used to work with string data. I think that you are familiar with such things as: contains, substring, trim ... Well, I told you.


Creating custom tag library

Generally speaking, to create your own tag library you don’t have to do much. Namely, you have to do two things:
  1. Create a .tld file, which is essentially a XML document and describes the structure of your TagLib
  2. Create a handler class that will describe the internal structure of the tag

This is in general. Now let’s consider in more detail what you need to do to come from nothing to the simplest, but working tag.

Tag Library Descriptor

A TLD should be created in the /META-INF/ directory or in any other of its subdirectories. The one, who has read the documentation or tutorial on TagLib, may note that the location of a TLD file depends on how we're going to pack the project, and will be absolutely right. The method described by me is suitable for the case when the project is packed in a JAR, but if you choose the way of WAR, then the TLD must be in the /WEB-INF/ directory. My choice is explained by the fact that, in my opinion, it’s much more logical, when the library is in a JAR file and can be connected to any project, rather than created and used only in one.
Here is a simple example of a TLD:

<?xml version="1.0" encoding="UTF-8" ?>
<taglib
     xmlns="http://java.sun.com/xml/ns/javaee"
     xmlns:xsi="http://www.w3.org/2001/XMLSchema-instance"
     xsi:schemaLocation="http://java.sun.com/xml/ns/javaee
     http://java.sun.com/xml/ns/javaee/web-jsptaglibrary_2_1.xsd"
     version="2.1">
     <tlib-version>1.0</tlib-version>
     <short-name>scltg</short-name>
     <uri>http://taglib.test.eleks.com</uri>
     <tag>
          <name>smpl</name>
          <tag-class>com.eleks.test.taglib.SimpleHandler</tag-class>
          <body-content>empty</body-content>
     </tag>
</taglib>
Colored with dumpz.org
All that interests us here is the <uri> tag, the content of which will help us in declaring the library on the JSP and the <tag> tag, remarkable for its almost recursivity, and that it still describes something that we are striving for so hard. In <tag-class>, you should indicate the fully qualified name of the tag handler class.
It should be added that there is a way of describing tags by tag files, but for convenience, I’ve done what I’ve done. If anyone is interested, they can look for the alternative option by themselves.

Tag handler class

There you go. We’ve got around to it. Get ready, there will be a surprise right now.

package com.eleks.test.taglib
import java.io.IOException
import javax.servlet.jsp.tagext.SimpleTagSupport
import javax.servlet.jsp.JspException
class SimpleHandler extends SimpleTagSupport {
     @throws [IOException]
     @throws [JspException]
     override def doTag() {
          getJspContext().getOut()
               .write("Hello, I'm a simple Scala tag!");
     }
}
Colored with dumpz.org
Strange annotation, strange "override def"… Yep, it’s Scala. 
For those who are greatly worried, I’m showing the same handler code for Java:

public class SimpleHandler extends SimpleTagSupport {

     public void doTag() throws JspException, IOException {
          getJspContext().getOut()
               .write("Hello, I'm a simple Java tag!");
     }
}
Colored with dumpz.org
I inherited from SimpleTagSupport to facilitate my work. In fact, there is an array of possible outcomes, and as always you can view the documentation for details.
That's all, it seems. I will also say a few words about how it all works, so you know which way to go.
In order to combine Java and Scala, a separate Maven project was created, which, as I have said, was compiled in a jar file. You can google for tutorials, so I won’t go into details, not to increase the entropy. Ok, but as for Pom.xml ― only things concerning Scala:

<properties>
     <scala.version>2.10.2</scala.version>
</properties>
<repositories>
     <repository>
          <id>scala-tools.org</id>
          <name>Scala-Tools Maven2 Repository</name>
          <url>http://scala-tools.org/repo-releases</url>
     </repository>
</repositories>
<pluginRepositories>
     <pluginRepository>
          <id>scala-tools.org</id>
          <name>Scala-Tools Maven2 Repository</name>
          <url>http://scala-tools.org/repo-releases</url>
     </pluginRepository>
</pluginRepositories>
<dependencies>
     <dependency>
          <groupId>org.scala-lang</groupId>
          <artifactId>scala-library</artifactId>
          <version>${scala.version}</version>
     </dependency>
<dependencies>
<build>
     <sourceDirectory>src/main/scala</sourceDirectory>
     <testSourceDirectory>src/test/scala</testSourceDirectory>
     <plugins>
          <plugin>
               <groupId>org.scala-tools</groupId>
               <artifactId>maven-scala-plugin</artifactId>
               <executions>
                    <execution>
                         <phase>compile</phase>
                         <goals>
                              <goal>compile</goal>
                              <goal>testCompile</goal>
                         </goals>
                    </execution>
               </executions>
               <configuration>
                    <scalaVersion>${scala.version}</scalaVersion>
                    <args>
                         <arg>-target:jvm-1.5</arg>
                    </args>
               </configuration>
          </plugin>
     </plugins>
</build>
Colored with dumpz.org

To use the tag library I’ve created another Maven project, which stated the following in the pom.xml file:

<dependencies>
     <dependency>
          <groupId>com.eleks.test</groupId>
          <artifactId>taglib</artifactId>
          <version>0.0.1-SNAPSHOT</version>
          <scope>import</scope>
     </dependency>
</dependencies>
Colored with dumpz.org

Everything is easy.

Using on the JSP

So, here is an example of JSP using the library written by us:

<%@ page language="java" contentType="text/html; charset=ISO-8859-1"
pageEncoding="ISO-8859-1"%>
<%@ taglib uri="http://taglib.test.eleks.com" prefix="scltg" %>
<!DOCTYPE html PUBLIC "-//W3C//DTD HTML 4.01 Transitional//EN" "http://www.w3.org/TR/html4/loose.dtd">
<html>
     <head>
          <meta http-equiv="Content-Type" content="text/html; charset=ISO-8859-1">
          <title>Insert title here</title>
     </head>
     <body>
          <scltg:smpl/>
     </body>
</html>
Colored with dumpz.org
The important points are highlighted in grey. The first thing is what I’ve already mentioned — we declare our Taglib and specify a prefix, with which we will refer to tags. And the second thing is actually our tag call: prefix, colon, tag name. As you see, the tag has no body, it’s just because the following thing was declared in the TLD:
<body-content>empty</body-content>
That’s it.


Pre conclusion

It was really cool. Moreover, it works. How useful is it? Well, I don't know. It's useful the way something useful has to be. Neither more nor less.


Conclusion
“Many that live deserve death. And some that die deserve life. Can you give it to them? Then do not be too eager to deal out death in judgement.” 
― J.R.R. Tolkien, The Fellowship of the Ring

Technologies become obsolete. This is a fact. Those which had no time to become obsolete (and sometimes even just to grow into something really demanded) are forgotten, lost, discarded with outbursts : "But why do we need it, after all, there is the ‘technology name’.” The fashion in the world of IT is as whimsical as any other fashion. And there's nothing you can do about that. Not so long ago, PC came to replace huge computing machines with access through terminals, then they were followed by laptops, then by netbooks and tablets, then cloud technologies came. The circle has been closed?
Nevertheless, and even more, there is always a need to go back to something old. Why not do it using something new? Maybe I gave the answer for the case of the JSP Tag Library.

6/19/2013

Scaladroids: Developing Android applications using Scala

Scala is a functional and object-oriented programming language. It is statically typed and designed to concisely express your programming ideas in an elegant, type-safe and lightweight manner. Moreover, Scala compiles down to Java bytecode. This allows Scala applications to leverage the usage of existing Java libraries.

On the other side, Android is one of the most popular mobile operating system nowadays. Android applications are usually developed with Java. Source code compiles down to JVM bytecode and later gets translated into Android's 'dexcode'.

Why not try combining both of the technologies?

The presentation below explores the ways in which Scala can be applied to Android development. Look inside and comment, how you leverage the power of Scala!


Presented by Ostap Andrusiv, Software Engineer during Android Developer Days 2013 in Ankara.